Azure DevOps Pipelines
前段时间给我的一个项目上了Azure DevOps 的 Pipelines,顺带着就给那个项目的文档和这个博客一起换上了 Azure 的 CI。
开始使用
先在 https://azure.microsoft.com/en-us/services/devops/ 使用GitHub登录,具体是不是必须要绑定一个微软账号我记不清了。
然后就是授权什么的,选定你需要用ci的项目,然后巴拉巴拉一度操作,这些不重要的就略过了,详细说一下后面的操作。
GitHub Releases
这个是我的弹幕后端配置的CI,简单说一下流程,就是我push到master分支,ci会自动帮我检查编译,需要发布新版本的时候,只需要创建一个tag就可以了,这个时候ci会帮我自动编译,并发布一个新版本出来。
如果你也需要做 .net core 项目的ci,可以参考一下我写的配置文件。
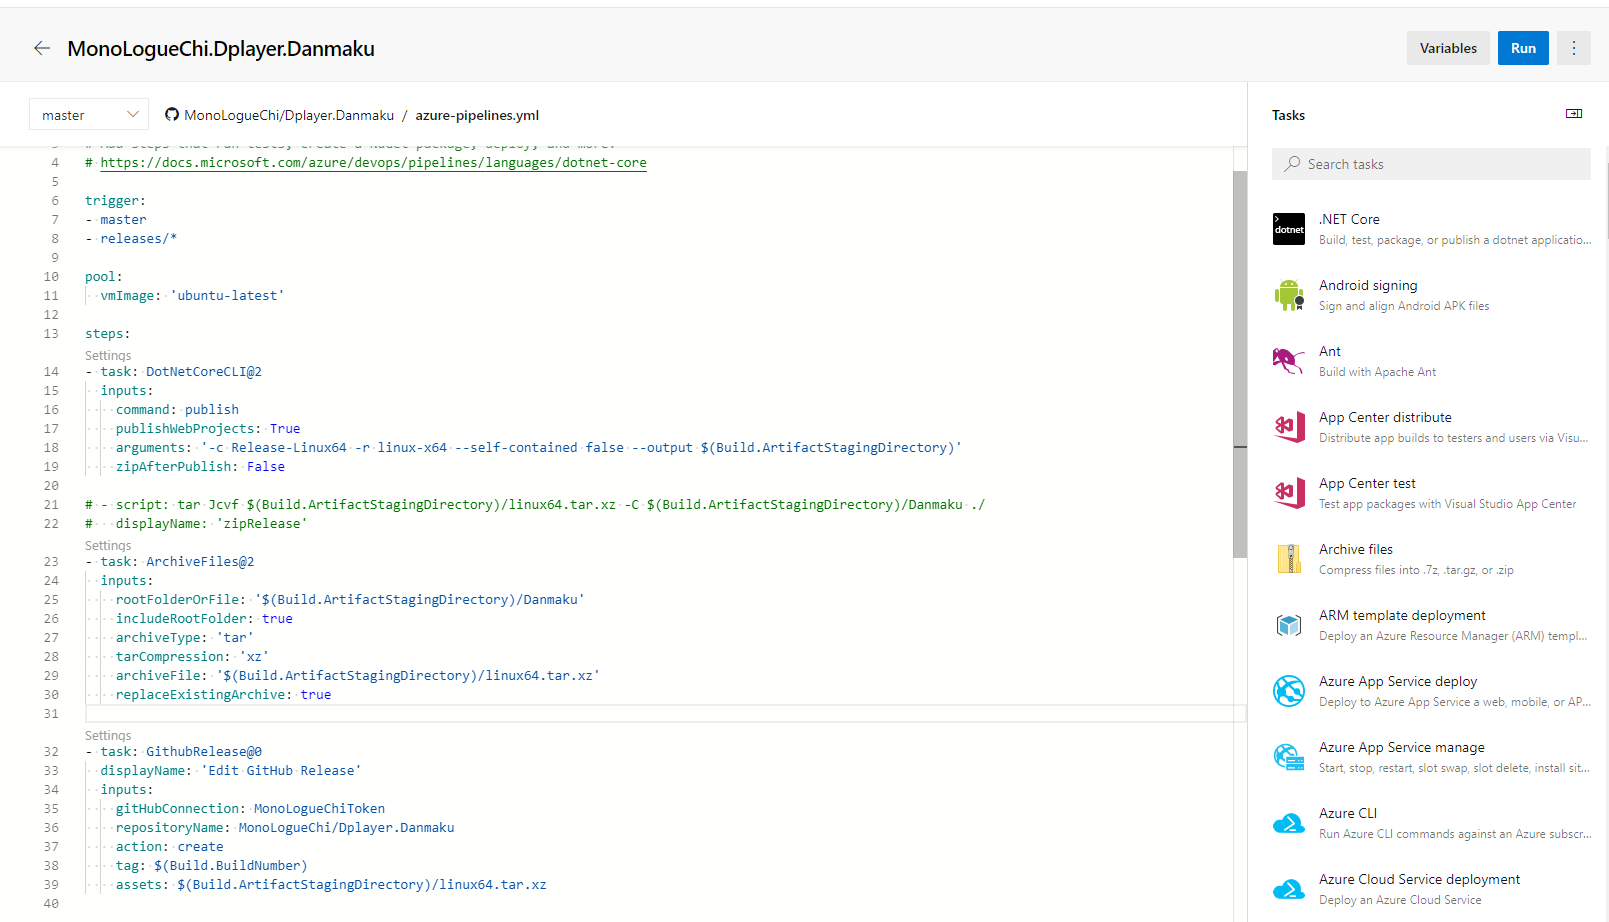
编辑界面是这样的,后面会简单解释一下这个是怎么写出来的。

trigger:
- master
- releases/*

pool:
  vmImage: 'ubuntu-latest'
这一部分没什么说的,看文档就好了,master分支和releases会触发ci,系统镜像是 Ubuntu 18.04(写这篇文章的时候是这样的,以后可能会更新)。
steps:
- task: DotNetCoreCLI@2
  inputs:
    command: publish
    publishWebProjects: True
    arguments: '-c Release-Linux64 -r linux-x64 --self-contained false --output $(Build.ArtifactStagingDirectory)'
    zipAfterPublish: False

- task: ArchiveFiles@2
  inputs:
    rootFolderOrFile: '$(Build.ArtifactStagingDirectory)/Danmaku'
    includeRootFolder: true
    archiveType: 'tar'
    tarCompression: 'xz'
    archiveFile: '$(Build.ArtifactStagingDirectory)/linux64.tar.xz'
    replaceExistingArchive: true

- task: GithubRelease@0
  displayName: 'Edit GitHub Release'
  inputs:
    gitHubConnection: MonoLogueChiToken
    repositoryName: MonoLogueChi/Dplayer.Danmaku
    action: create
    tag: $(Build.BuildNumber)
    assets: $(Build.ArtifactStagingDirectory)/*.tar.xz
这一部分就是任务流程了
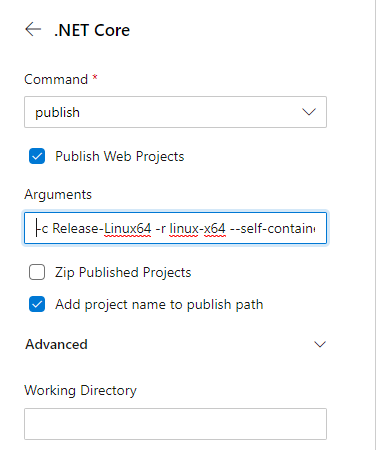
第一个任务是publish,也就是编译。在侧栏的Task里找到 .NET Core,应该就是第一个,然后选择publish,参数的话就是你在正常发布时候用的参数,不懂的可以看文档

这样就好发布一个版本出来,在$(Build.ArtifactStagingDirectory)目录下。
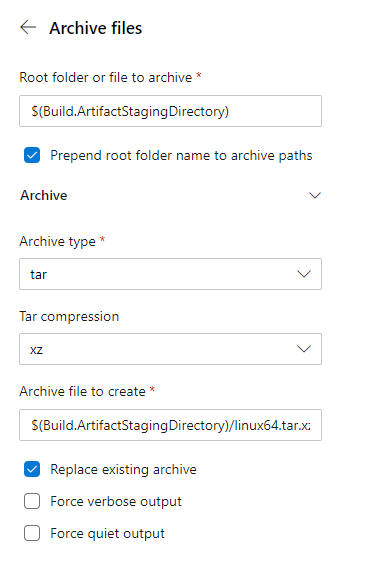
发布完成以后就是打包,由于是Linux版本,就用tar压缩,我选择的是tar.xz。找到Archive files,然后填上参数就可以了。

打包也完成了,就剩最后一步,发布,上传到GitHub上。
首先要有一个GitHub Connection,需要使用Token连接,这个具体操作看文档,然后按照下图设置就可以了,其实更简单的是直接复制配置文件然后去更改。


需要发布新版本出去的时候,只需要commit之后创建一个tag再push就可以了,这样CI就会自动将编译好的文件发布到GitHub上,并且还会带上更新日志。
GitHub Pages
这一部分我是纯手打出来的,虽然也有现成的插件,但是那个东西和自己手打有啥区别呢?都不能直接使用GitHub Connection里的Token。我自己也写了一个插件,但是局限性也比较大,后面看看能不能优化一下,如果可以的话争取开源出来。
这一部分主要就是将生成的静态网页提交到gh-pages分支上。
trigger:
- doc-source

pool:
  vmImage: 'ubuntu-latest'

variables:
- group: github

steps:
- task: UseNode@1
  inputs:
    checkLatest: true
- task: Npm@1
  inputs:
    command: 'custom'
    customCommand: 'install hexo-cli -g'
- task: Npm@1
  inputs:
    command: 'custom'
    customCommand: 'install --pure-lockfile'
- task: Npm@1
  inputs:
    command: 'custom'
    customCommand: 'install --pure-lockfile'
    workingDir: 'themes/hexo-theme-doc/'

- task: CmdLine@2
  inputs:
    script: |
      hexo g
      cd public
      touch .nojekyll
      git config --global user.email "$(EMAIL)"
      git config --global user.name "$(USER)"
      git init
      git add .
      git commit -m update
git push --force --quiet https://$(TOKEN)@github.com/MonoLogueChi/Dplayer.Danmaku.git master:gh-pages提交到doc-source分支以后,会自动生成静态网页,然后提交到gh-pages分支上,其中EMAIL、USER、TOKEN变量都设置再github组中,详细设置方法可以看变量和变量组相关文档。
再说一下我的博客,因为除了GitHub Pages,还需要提交到又拍云上,还有百度推送,这样就又多了两个步骤
trigger:
- master

pool:
  vmImage: 'ubuntu-latest'

variables:
- group: github
- group: upyun
- group: search

steps:
- task: UseNode@1
  inputs:
    checkLatest: true
- task: Npm@1
  inputs:
    command: 'custom'
    customCommand: 'install hexo-cli -g'
- task: Npm@1
  inputs:
    command: 'custom'
    customCommand: 'install --pure-lockfile'

- task: CmdLine@2
  inputs:
    script: |
      #百度搜索推送Token
      sed -i 's/your_token/$(BAIDU_PUSH_TOKEN)/g' ./_config.yml
      hexo g

      #又拍云同步
      wget -O upx http://collection.b0.upaiyun.com/softwares/upx/upx-linux-amd64-v0.2.4
      chmod +x upx
      ./upx login $(BUCKET) $(OPERATOR) $(OPERATOR_PASSWORD)
      ./upx sync public/ / --delete
      ./upx logout

      #GitHub Pages
      cd public
      touch .nojekyll
      git config --global user.email "$(EMAIL)"
      git config --global user.name "$(USER)"
      git init
      git add .
      git commit -m update
      git push --force --quiet https://$(TOKEN)@github.com/MonoLogueChi/blog.xxwhite.com.git master:gh-pages